Major Project Development Log 3: Main Development
Object Grab Animation
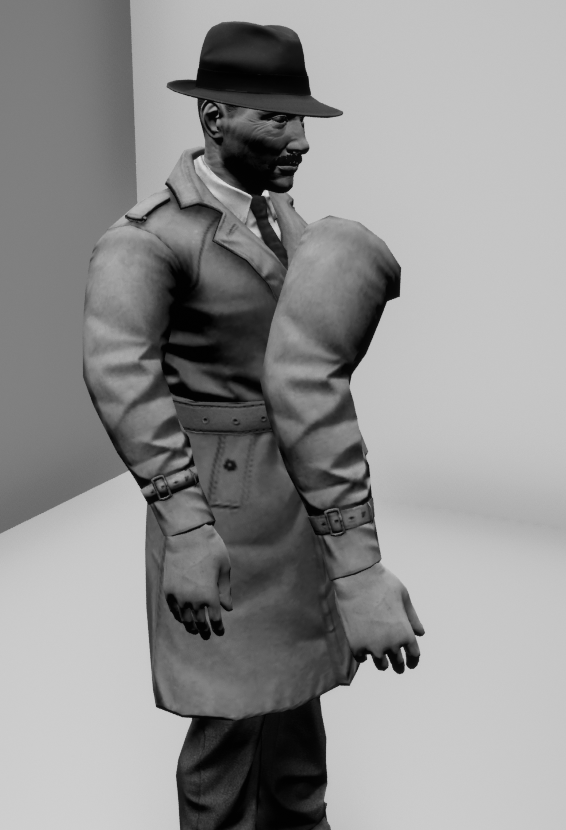
I decided to add a grab animation before certain objects were picked up to make it more engaging for the player and to add to the indication of something being picked up.
The animation was sourced from Mixamo (Taking An Item And Examining It) and imported into Maya along with the Detective model to make it easier to visualise intended changes. Once it suited what I needed, I removed all of the Detective model but one of the arms and imported it into Unreal. The arm was attached to the camera so the grab would always be aiming towards the object the player was looking at.
I added an additional branch block to the interaction functionality checking if a new Object Interface was implemented in the interact actor. This Object Interface is exclusively used to determine if the grab animation should play for an actor. If the interact actor does have this interface, then the grab arm is made visible and the animation is played. After 1.2 seconds, the arm is hidden and the Interact Interface function is called.

The grab worked fine but it slowed down the game when collecting clues so in Unreal Engine I changed the rate scale in the asset details to 2.0 which doubled the speed of the animation.
I added some new blocks to the grab functionality that hid and unhid the right arm of the main model so the character didn’t have two right arms when grabbing. I also adjusted the delay to last 0.3 seconds which matched the sped up animation.

Line Trace Detection
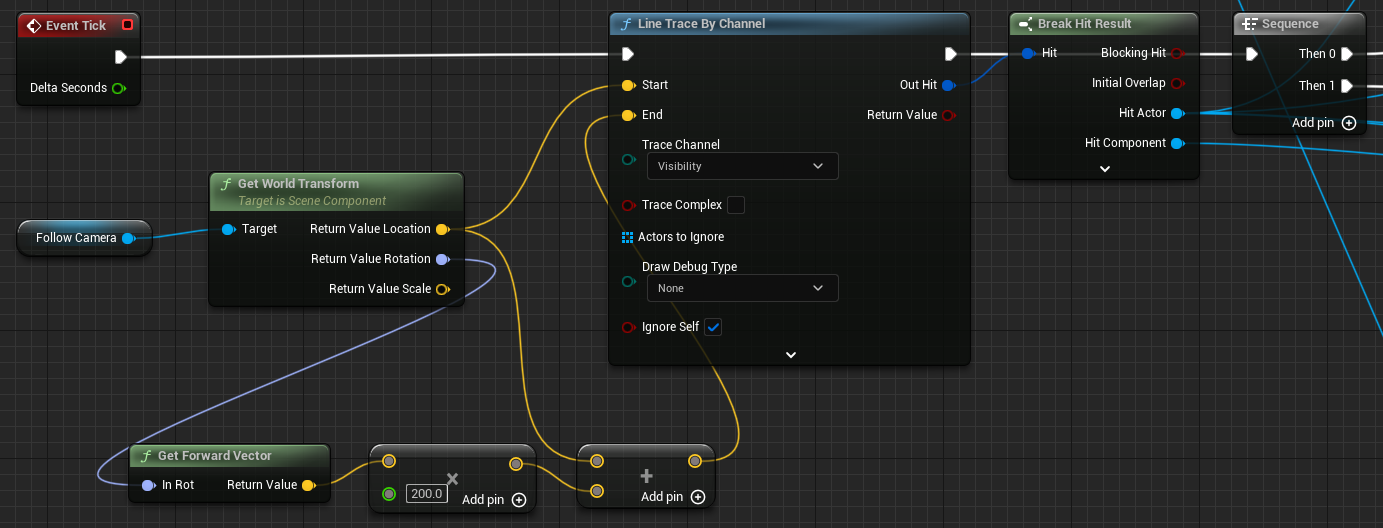
The way the interactable object detection worked behind the scenes was a little clunky so I decided to change how it from using a box collision overlap to a line trace hit. A crosshair was also added to indicate when a hit was happening. The video includes debug lines to represent the line trace to better demonstrate the change.
The line trace starts at the center of the camera and ends at a distance set by multiplying the forward vector of the rotation and adding it to the location. This can be adjusted by changing the value the forward vector is multiplied by. Using a break hit result block allows me to set the Interact Actor variable to whatever actor is being detected if it has the Interact Interface.
Originally, there was an issue with the doors in which the player could overlap with the wrong box collision under specific circumstances causing the door animation to be wrong or change abruptly to moving the wrong way. The line trace change fixed this as the detection is a lot more precise stopping any potential issues like it.
To detect which side of the door the player was facing an additional part was added to the line trace functionality checking whether the component the line trace hit was the front so the correct event for either side could be set.

Inspection Mechanic
To add some complexity to gathering objects, I added an inspection feature that allows the player to look at certain objects. I used the feature with the revolver to hide obtaining a clue behind interacting with a specific part of the gun. The gun plays an animation which I created in Maya by rigging and keyframing the revolver made by one of the 3D modellers on the team.
This mechanic was implemented using a tutorial series by Matt Aspland shown below.
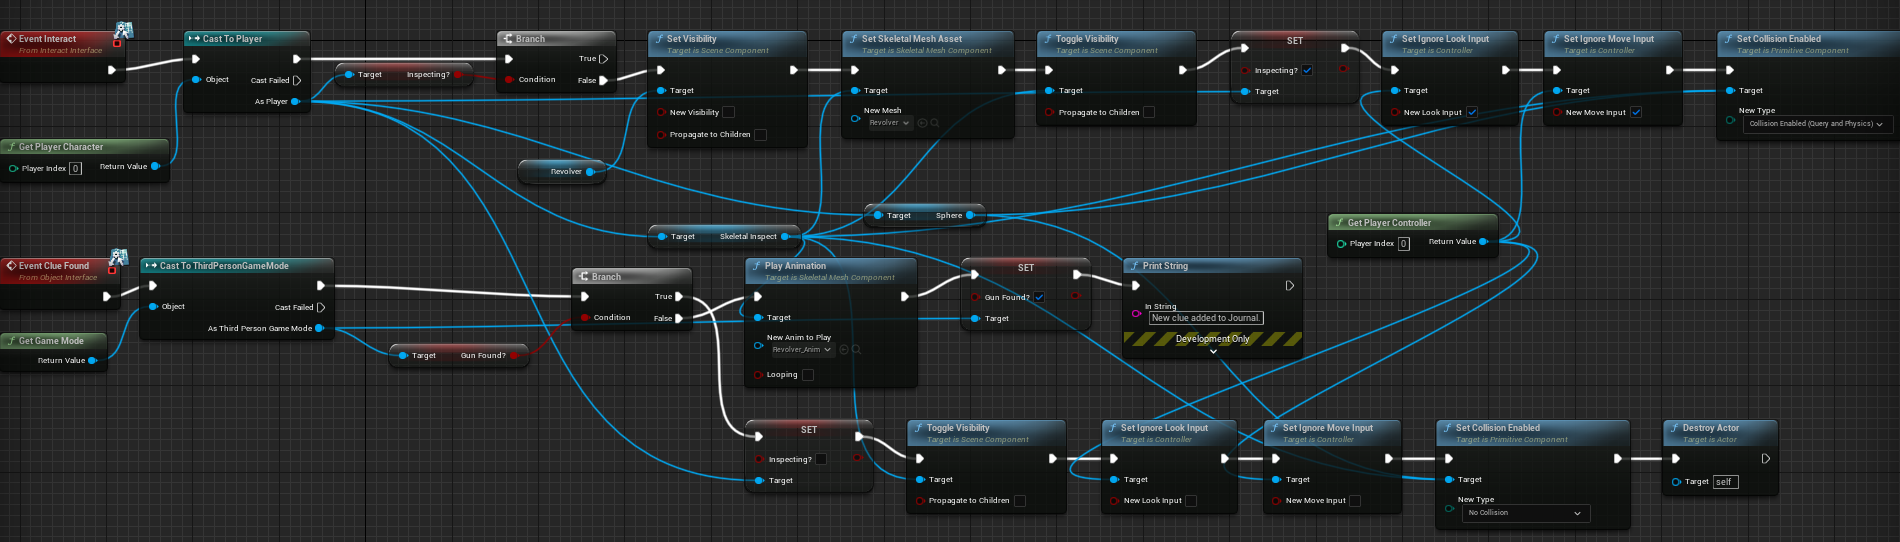
Interacting with the revolver actually hides it and sets an invisible skeletal mesh in front of the player’s camera to the same mesh and makes that visible. A new boolean named Inspecting? is then set to true as well as the player look and move input being disabled. The specific part of the gun is detected via a hidden sphere collision. Interacting with that for the first time plays the animation and sets the clue as being found while the second time hides the inspect mesh, reenables all of the player input and destroys the revolver actor as it is no longer needed.
The inspection allows the player to rotate the revolver by combining the axis value of the X and Y inputs of the mouse (with a multiplication adjustment of -1 to make it feel smoother) with the relative rotation of a component that the inspection actor is attached to and then setting the relative rotation of the component to the combined value with the mouse inputs as the starting events.

To focus on the inspect actor, I decided to add a translucent background that also blocked the line trace from being able to interact with anything behind the inspect. This was simply achieved by adding a cube behind the inspect actor in the player blueprint which only appears when the inspect is happening.
Wardrobe Interaction
Using similar functionality to the doors, I implemented the ability to open up the various wardrobes throughout the boat level. This would allow items to be hidden within the wardrobes.
The hidden room wardrobe was changed to make use of this mechanic by having a secret door at the back of the wardrobe that could be opened once the player is given information. The secret door is still opened using a level sequence as there were some issues using the timeline method in which the rotations would not work how they were supposed to.
Lockpicking Mechanic
To diversify the gameplay a little more, I added a lockpicking minigame to some objects. The player must first find a lockpick (which uses the same blueprint and functionality as the keys) in order to open locked containers and find certain clues. The lockpicking minigame is displayed in the UI using a scene capture of the assets spawned out of the map.
I created this mechanic following this tutorial series by Ryan Laley using found assets from SketchFab.
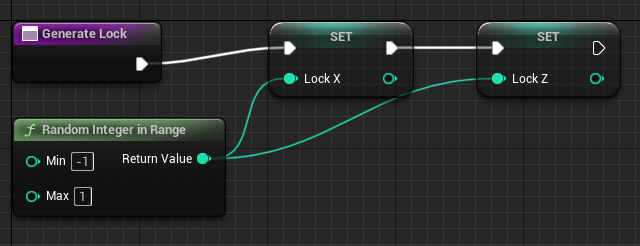
The lockpicking blueprint is spawned when the player interacts with a object that can be lockpicked. When it’s spawned, the crosshair is hidden and input is enabled for it while being disabled for the player character. A blueprint block is also used to hide the environment behind wherever the lockpick blueprint was spawned and then the “Generate Lock” function is called. The inputs used for the lockpick are the forward (W = 1 S = -1 and right (A = -1 D = 1) movement keys (WASD) which allows eight different combinations for unlocking. The inputs are made into a rotator that sets the relative rotation of the lockpick on tick. If both inputs nearly match the generated lock positions then the lockpicking input is disable and a timeline is used that rotates the lock to show that it’s unlocked. After the timeline, the player character input is restored and the lockpicking UI is hidden allowing the lockpicking blueprint to be destroyed as it is no longer needed.

To generate the unlock positions, a random integer between -1 and 1 is generated for the X and Z variables that put together will make one of the eight possible combinations.
Game Introduction
I implemented the intro of the game in the bar area above. The only mechanics used are the dialogue and journal mechanics. Each character in the bar has a dialogue tree that reacts to the different states of the intro investigation.
Modular Clues
I adapted the original functionality of the clues to work modularly under one blueprint. This was because the way I originally did it required a lot of repeated functionality because of slight differences. To do this I added a new public text variable named “Other Clue Needed” which could be changed for each instance of the clue blueprint. I also optimised the blueprint a little as there were some unnecessary inclusions before as only the first clue would need to be checked on the second press.
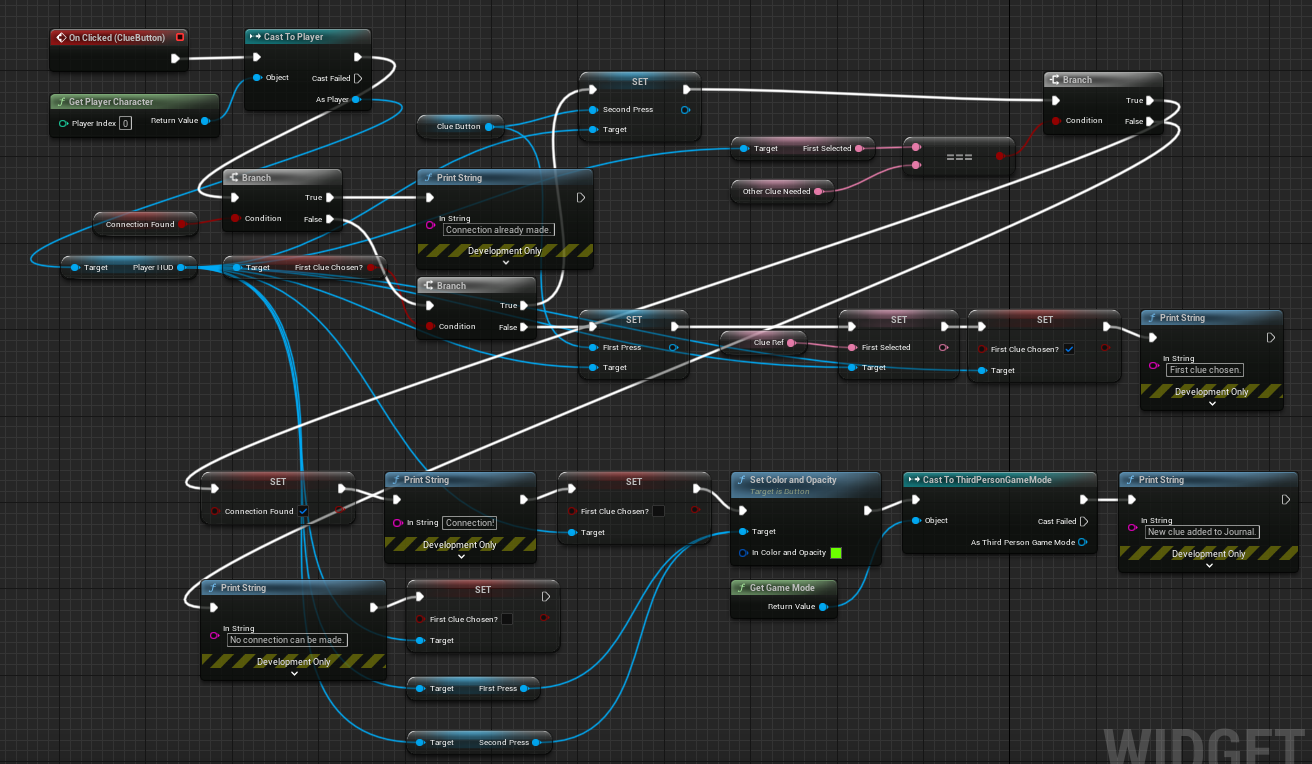
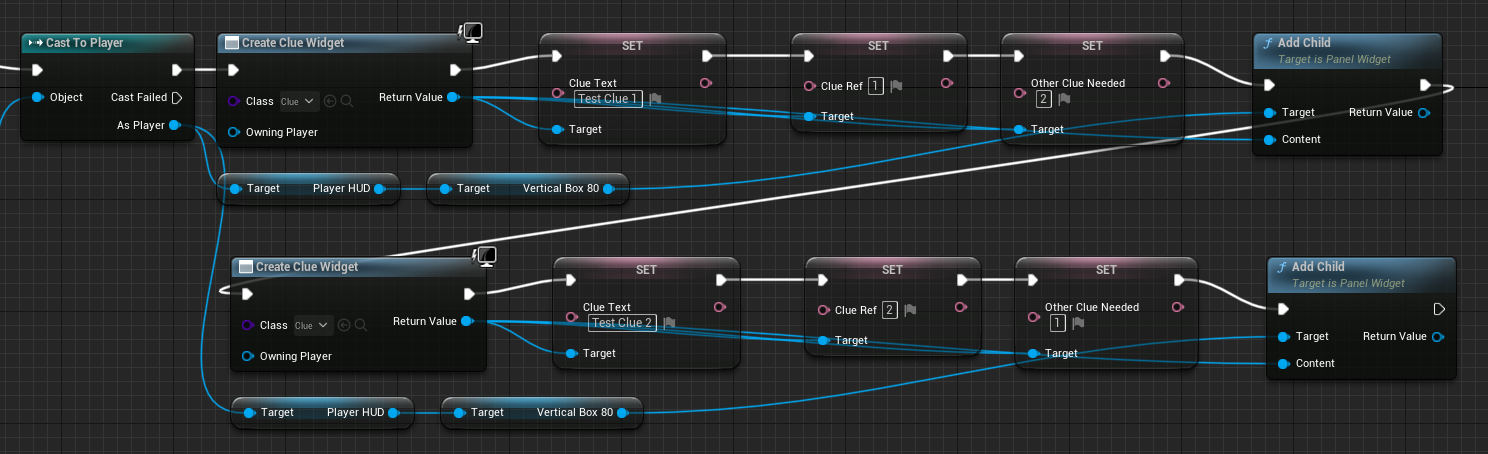
Shown is an example of the variables that need to be set when a clue is added to make the deduction functionality work.
Journal System
I first adapted the existing journal that was a remnant of the evidence board and changed the visuals to better match what it was supposed to be. The clues were all readded using the modular clue system.
I added an “Inventory” part to the journal that displays everything that is added to the string array that acts as the player’s inventory. I also started implementing the character profile part of the journal which will include backstory for each character as well as the clues that relate to them. Every time the journal is opened, an event called “InventoryReset” is called.
This event clears the inventory section and puts every string in the inventory array as a child of the inventory box using another widget as a base for them. It is called every time the player opens the inventory but it will only have a visible impact if the player receives a new item.

This journal was made partially using this tutorial series by Darkfall.
I added a profile for the player character which contains the inventory and implemented the rest of the characters. The player can only see the player character’s and the victim’s profiles at the start but as they progress to the main part of the game the rest of the profiles can be accessed.
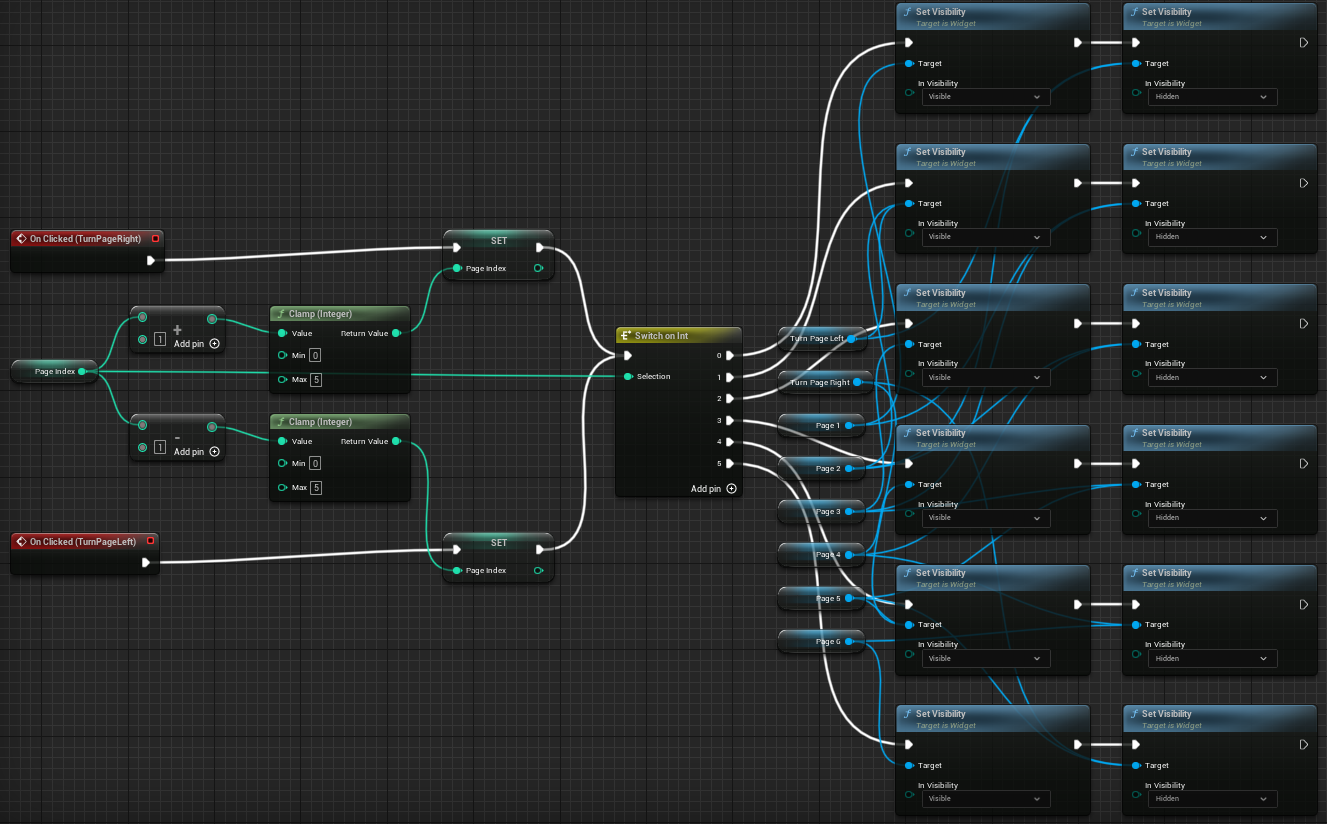
To toggle between pages I used a block that has executions based on the value of an integer. This integer would be used as the page index and it would either increase or decrease based on which arrow was pressed if possible. The integer was clamped between 0 and 5 as there was only six pages needed for the journal. Each execution for 0 to 5 shows the correct page and hides the other page or pages that it could have previously been on. The arrows are hidden if they can’t be used to go to another page also.
When the arrows are hovered over they display text to show that they are clickable as well as giving extra feedback to the player.

I created an event called “GotClue” to show when a clue has been added to the journal. It shows a UI element of a book and pen for a second before it gets hidden.

To make the readability and visuals better for the journal, I changed the font asset to another one already imported into the project by another team member and also implemented a book cover asset behind the journal sourced by the same team member. I also added the place where each character stays so the player would be able to find relevant NPCs easier and added a clues section in the player section for miscellaneous clues.
Final Gameplay
To add the effect of the boat moving, I used a level sequence that moved the environment around the boat that loops by resetting when it gets to a certain point.
I added another NPC to the intro that gives an additional clue.
To progress the game the player has to get most of the clues in the intro and then speak to the captain.
I added clues that serve to give information to unlock either new dialogue or hidden areas.
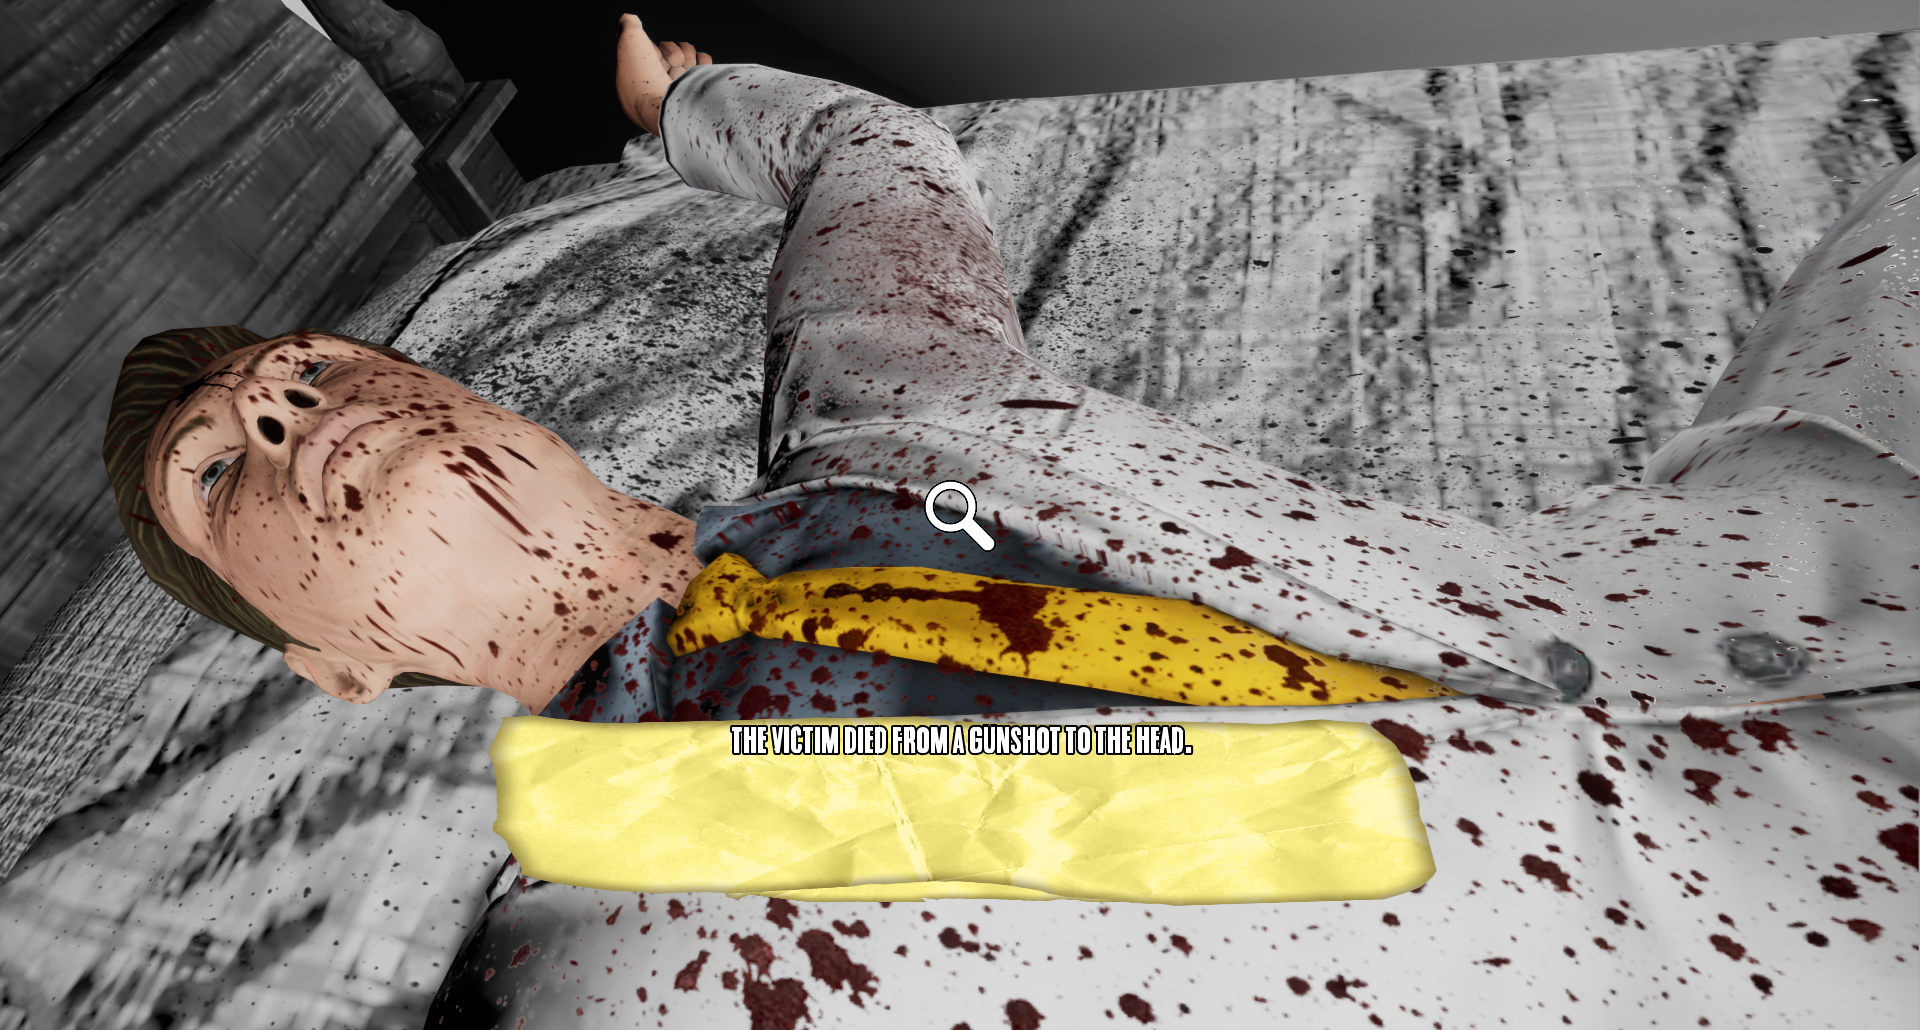
To improve on the aesthetic of the murder, I used a Megascans blood asset from Quixel Bridge.
I added NPCs with different purposes in this section. Some NPCs can be asked questions with more options based on the information you have while others are there to assist the player by hinting what to do or to give the player an item to progress.
I adjusted the suitcase so that it needed to be lock picked and so it had a clue that made a bit more sense narratively. I also added the trunk into the hidden room so that the gun was hidden in it.
References
Aspland, M. (2021) Inspect And Rotate Item | Inspect Item Part 2 – Unreal Engine 4 Tutorial [Video]. Available online: https://youtu.be/q62hIj9sHi0 [Accessed 06/05/2023].
Darkfall (2020) Unreal Engine 4: Part 7 – Journal / Notebook [Video]. Available online: https://youtu.be/pNVopBqZ_W4 [Accessed 15/05/2023].
eucocker (2019) Key [Model]. Available online: https://sketchfab.com/3d-models/key-a4aca11a2259462f8735a60eead33962 [Accessed 08/05/2023].
FlukierJupiter (2017) Journal [Model]. Available online: https://sketchfab.com/3d-models/journal-1e822119a75a4460b40c6f4001840743 [Accessed 16/05/2023].
Joseph, D. (2018) 357 magnum bullets [Model]. Available online: https://sketchfab.com/3d-models/357-magnum-bullets-7b8da3b0b25840d3a65ebd6e6c7aca38 [Accessed 07/05/2023].
Kelly, J. (2020) 3December 2020 – Cylinder Lock [Model]. Available online: https://sketchfab.com/3d-models/3december-2020-cylinder-lock-d18aedad20a24dc294121229fa5a5892 [Accessed 08/05/2023].
Laley, R. (2022) Unreal Engine 5 Tutorial – Lockpicking Part 1: Lockpick Actor [Video]. Available online: https://youtu.be/sJH4qXqA77k [Accessed 09/05/2023].
mixamo (N/A) Character Animations [Asset Resource]. Available online: https://www.mixamo.com/#/ [Accessed 06/05/2023].Animations Used:
Crying (Crying and Rubbing Eyes)
Idle (Female Idle)
Sitting Idle (Sitting Still In A Chair)
Standing Idle
Taking An Item And Examining It
Quixel Bridge (N/A) Blood Stain 1 [Texture Decal]. Available online: https://quixel.com/megascans/purchased?assetId=sg3bbd2c [Accessed 16/05/2023].
Quixel Bridge (N/A) Blood Stain 2 [Texture Decal]. Available online: https://quixel.com/megascans/purchased?assetId=shemcaac [Accessed 16/05/2023].
Quixel Bridge (N/A) High Velocity Blood Splatter [Texture Decal]. Available online: https://quixel.com/megascans/purchased?assetId=sfijfbip [Accessed 16/05/2023].
uxwing (N/A) Curved Arrow icon PNG and SVG Free Download [Image]. Available online: https://uxwing.com/curved-arrow-icon# [Accessed 15/05/2023].