Modelling the Character
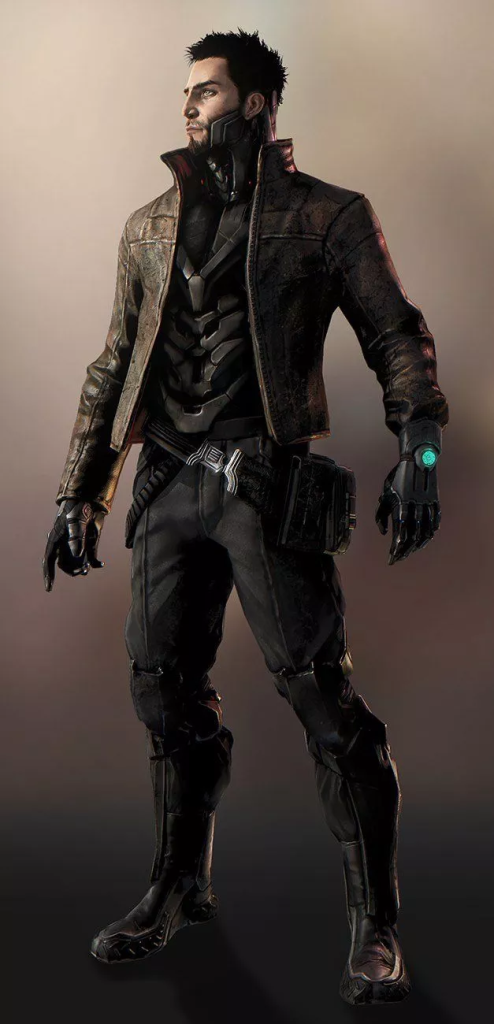
First Attempt:

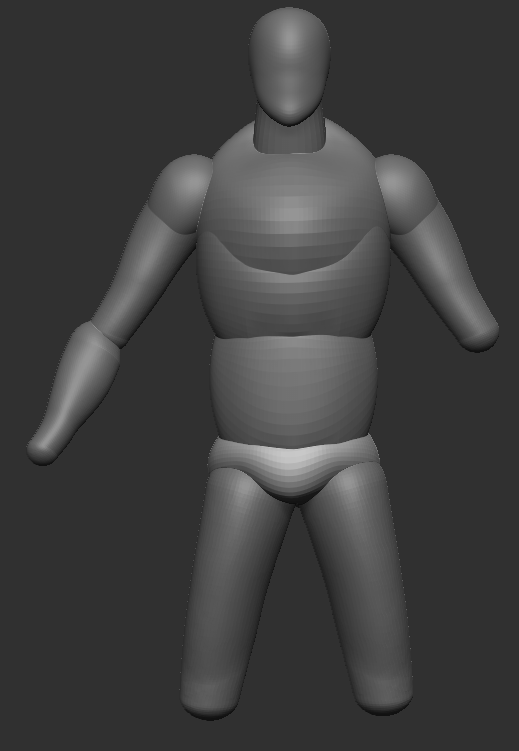
The first thing to do was to model the base mesh of my character as I wanted to model as much of the character I could to the best of my ability.

Head Base Mesh

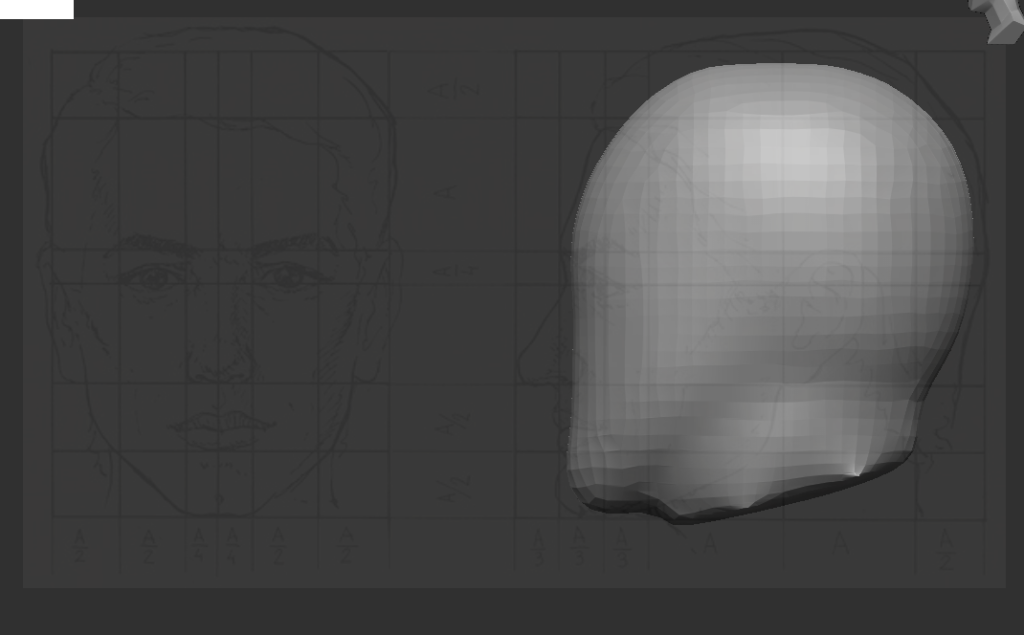
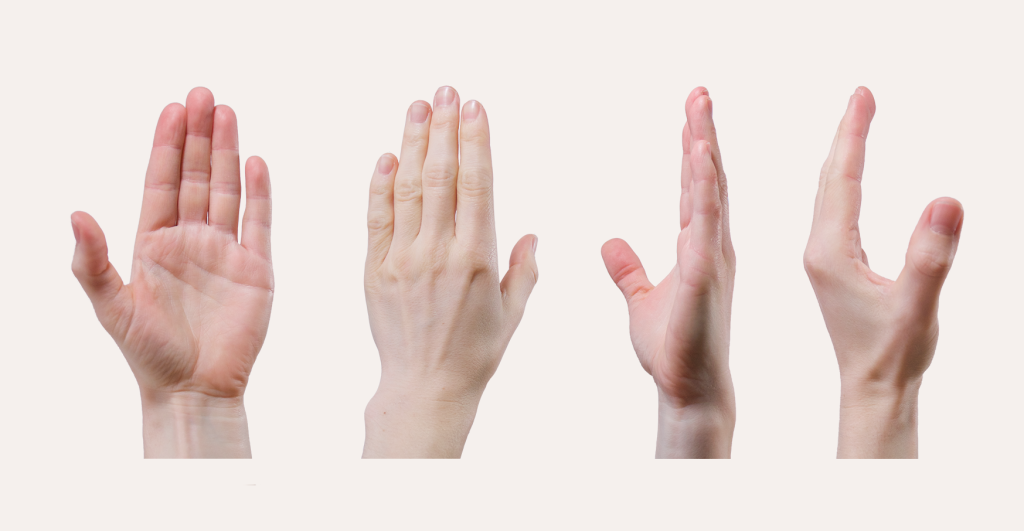
The head was made accurate to the proportion of an actual human using a reference image labelled Figure 9 (pacificgraphicdesign, n.d.). It was created by manipulating a sphere with different sizes of the move brush.

Figure 9 – head anatomy proportions 1 (pacificgraphicdesign, n.d.
Character Proportion Blockout (8 Head Method)

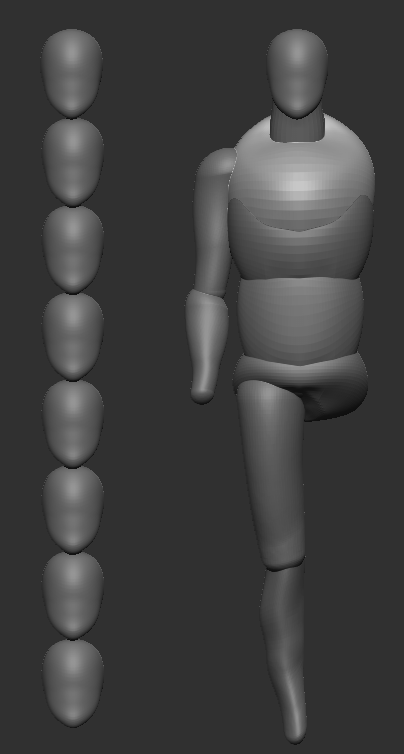
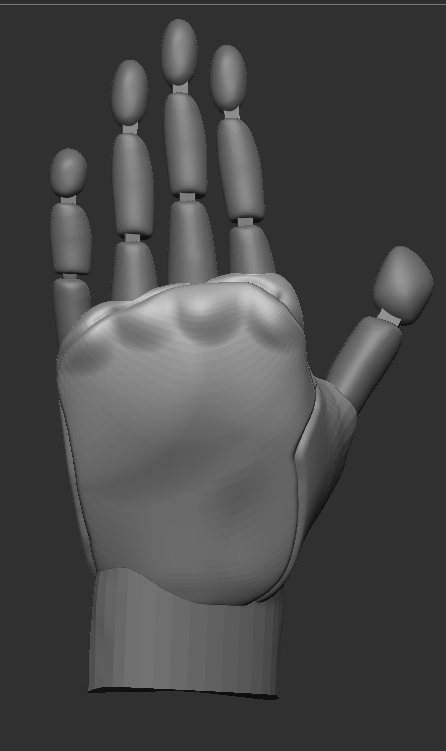
To create the rest of the base mesh, I manipulated a cylinder and spheres also using the move brush to deform geometry into a proportioned shape using another reference image: Figure 10 (Shafigina, n.d.). The eight head method was useful in getting the location of the body parts but the reference helped get the actual body shape.

Figure 10 – Ideal Proportion Male (Shafigina, n.d.)
Base Mesh Creation
Dynameshed Base Mesh
Head Model Time-lapse
Damaged Arm Model
Head Reattached to Body Model
Hand Time-lapse
Hand Reference
Jacket and Pants Models

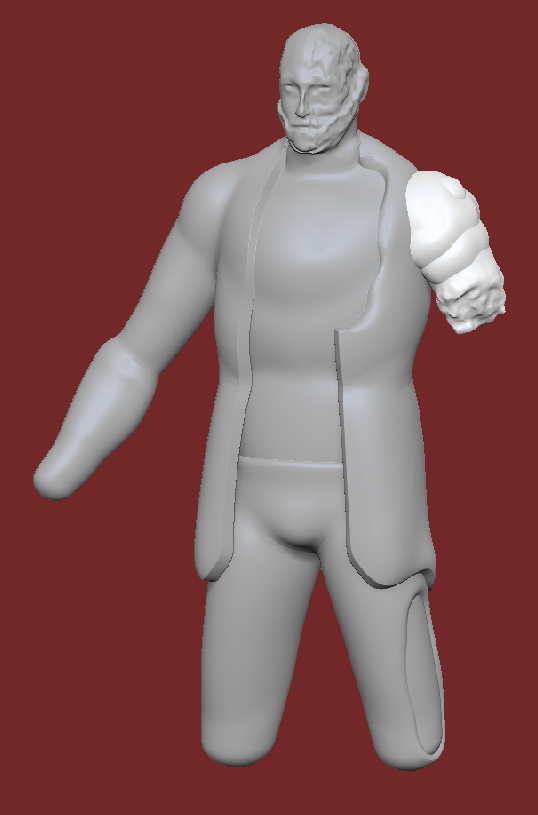
I masked the part of the area that each respective clothing item would be covering and used the extract modifier. I manipulated the clothing using the move brush so that the clothing was damaged.

Cybernetic Leg Model

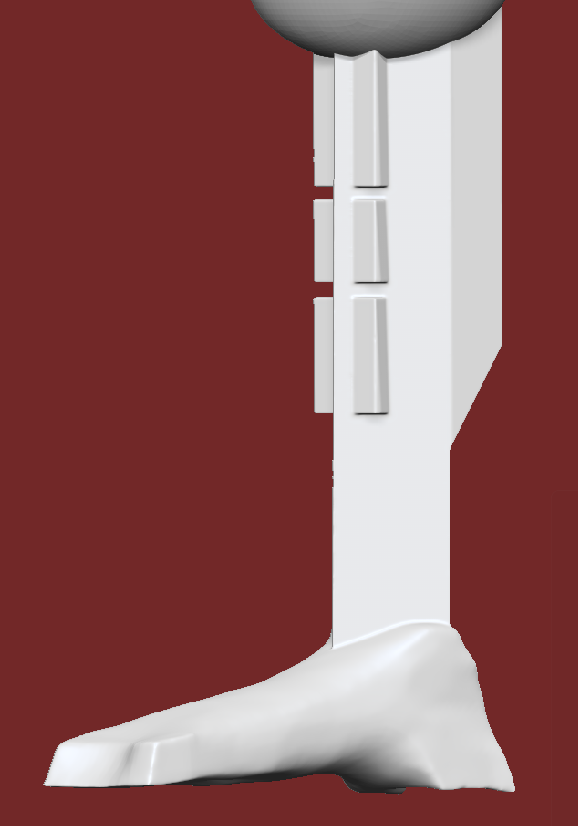
To create the cybernetic leg, I manipulated basic cubes within ZBrush and then dynameshed them together. The foot was then edited with the smoothing brush.

Final Parts Time-lapse

To create the hair and beard, I used fibremesh and changed the settings to make sure the length and number of ‘fibres’. I adjusted the shape of the hair using the move brush so that I could style the hair.
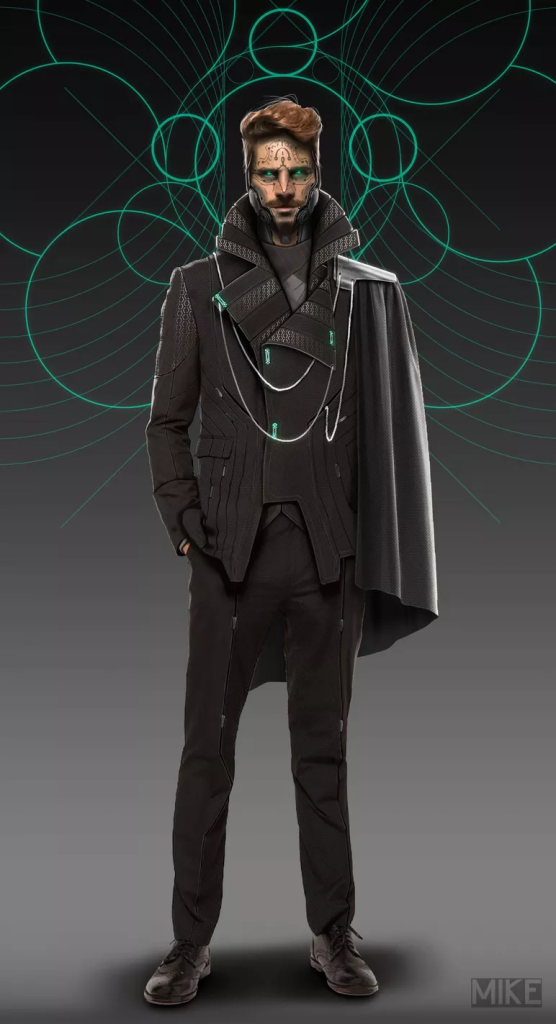
Second Attempt:

I wasn’t happy with my first attempt so I redesigned some aspects of the design. I could then adapt earlier versions into a version following the redesigns closely while avoiding earlier mistakes and issues.

Character Design Version 2

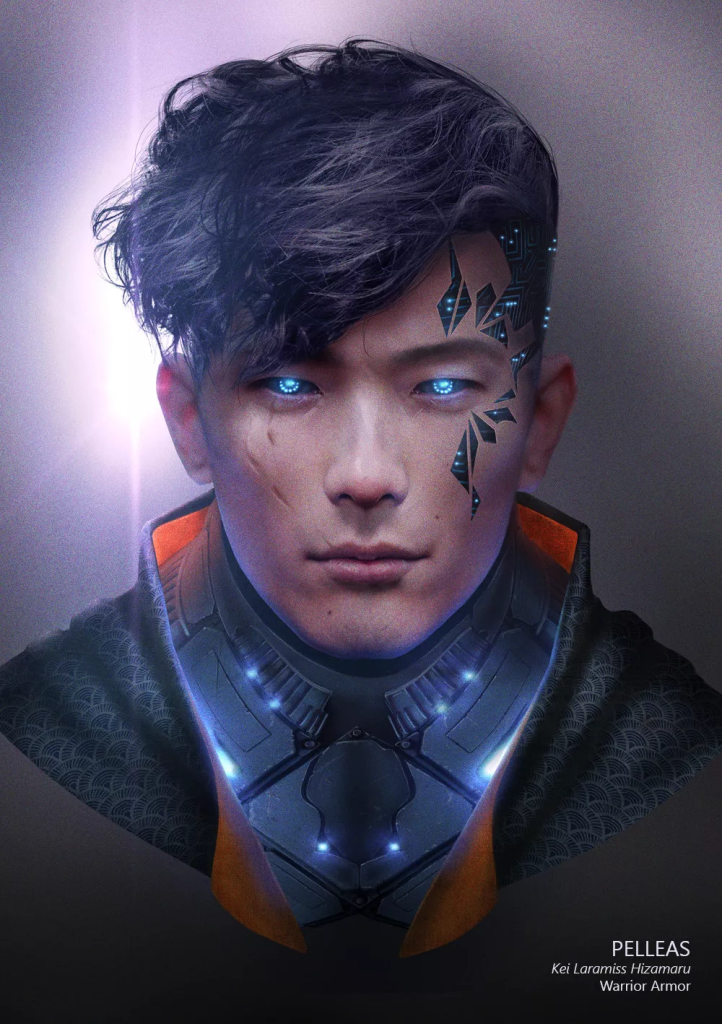
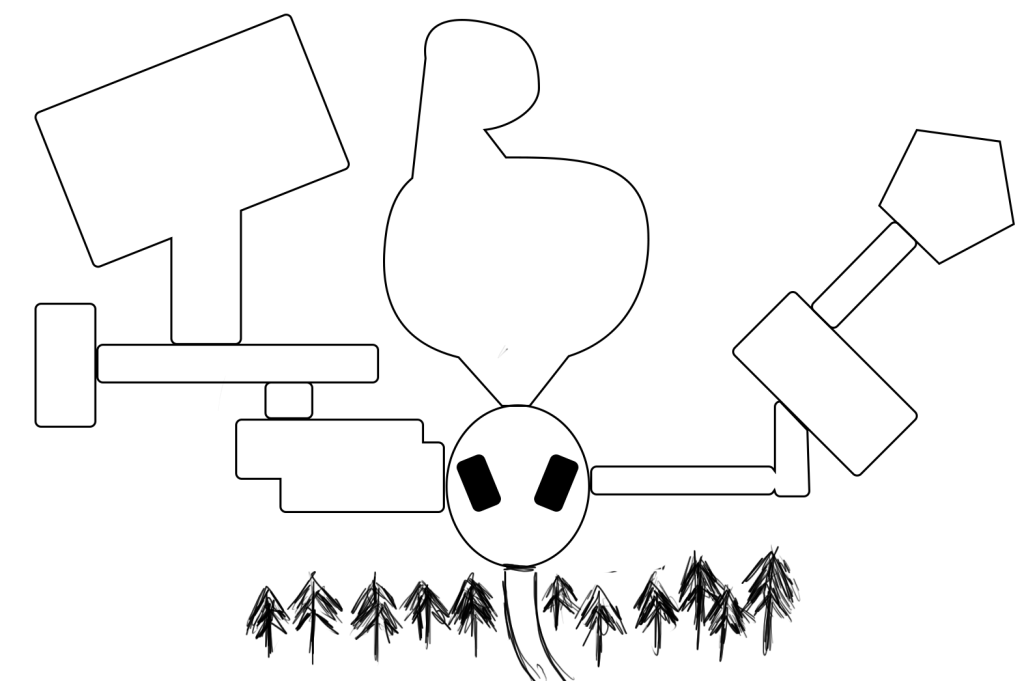
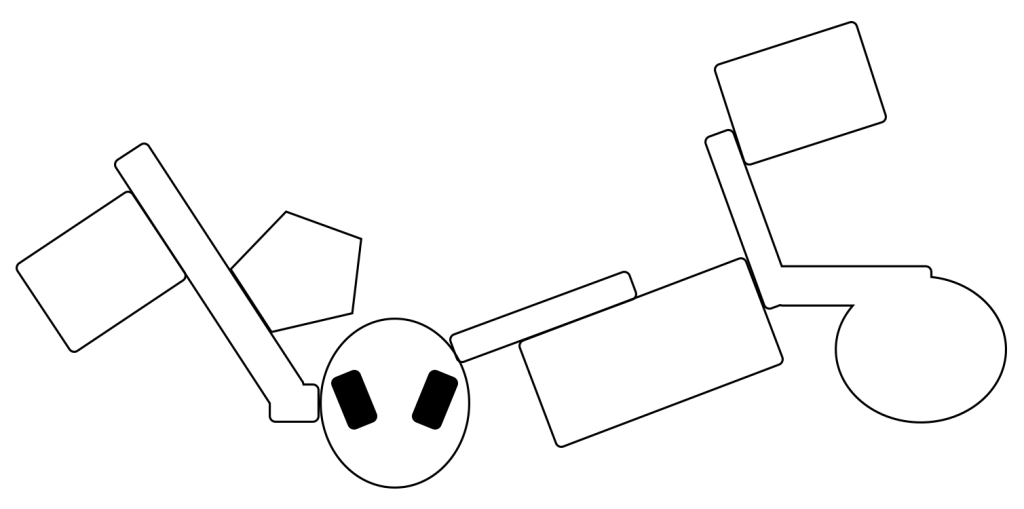
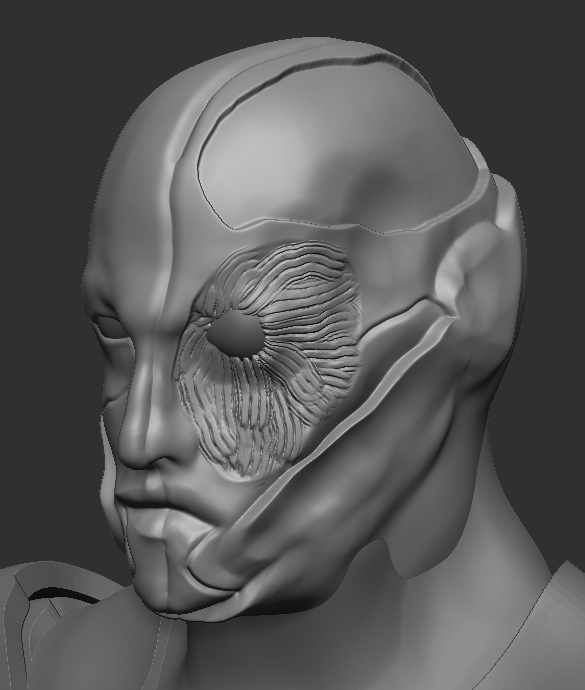
Most of the first model I made while experimenting without a clear plan so for the second design I thought up how I wanted the character beforehand so that it would inform the second model better. The end look probably was going to change but I had a better start with this approach. I redesigned the face and majority of the upper body as I removed the jacket and exposed inner elements of the face.

Head Model Version 2 Time-lapse

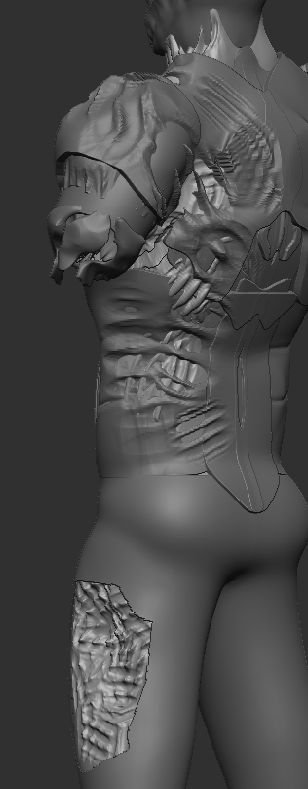
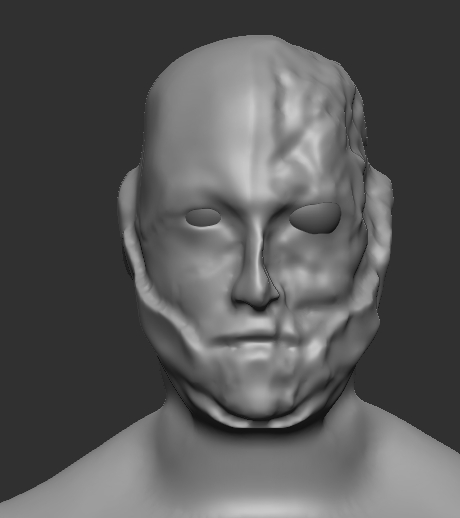
The head of the first model I liked the most but I decided to still change the damage on the left side to match the new design. I reverted to the point before I added the damage and subdivided so I could add more detail as an issue with the first was most of the facial details were lost. I used the dam standard brush to indent into the face, to bring out the lip lines and to create the face border. I turned off symmetry when making the border so it was messy as a straight border wouldn’t fit the character narrative. The damage around the eye was done by indenting the area using the inverse clay brush so that it would take away from geometry. I used the rake brush to create geometry here as this looked like exposed parts within the face and was like the new design sketch. The top-side of the head was masked so that I could use the move brush to indent this area without affecting the rest of the head. I then used the move brush to add more smaller damage.
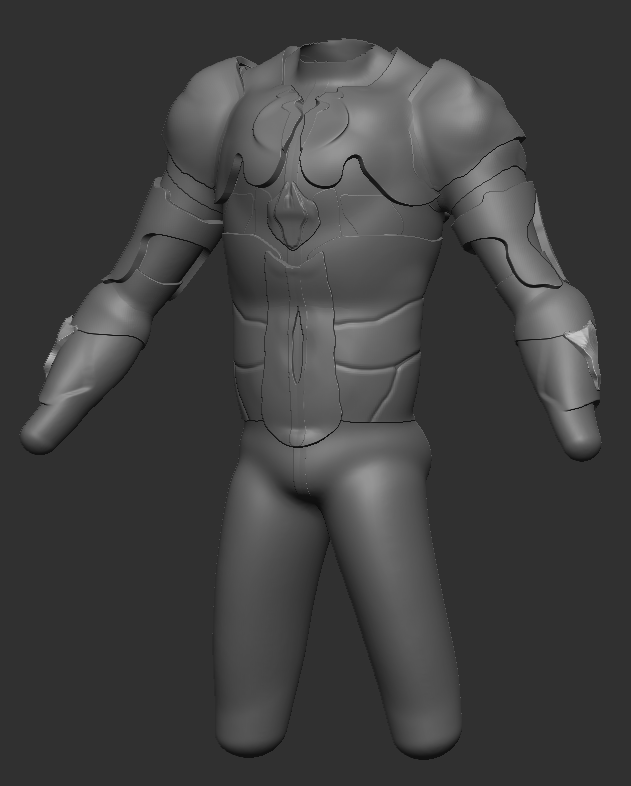
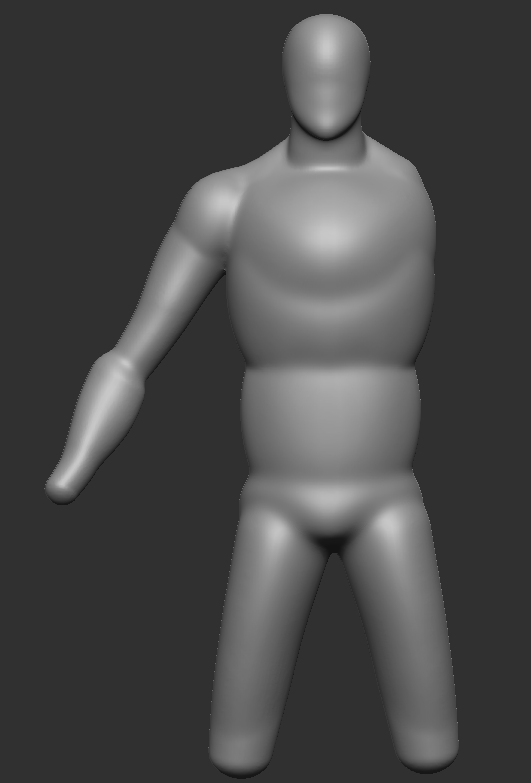
Body
Model Front

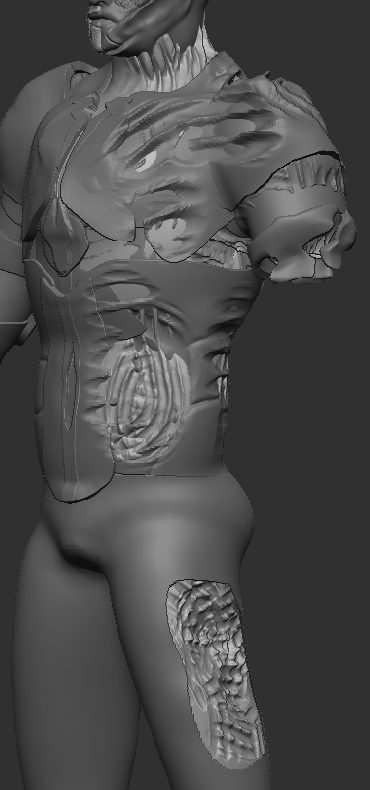
The new base model is based off the original as the undamaged side of the body was mirrored so I could get the other arm back as I wanted to make the damaged arm differently. Inconsistencies with the geometry of both sides was fixed but a seam along the middle was created. This would be an issue if it was a human character, but I think the seam added to manufactured feel of my character which is part of the narrative. In any case it would be mostly covered up by the time this variant of the character model is finished.

Body Model Back

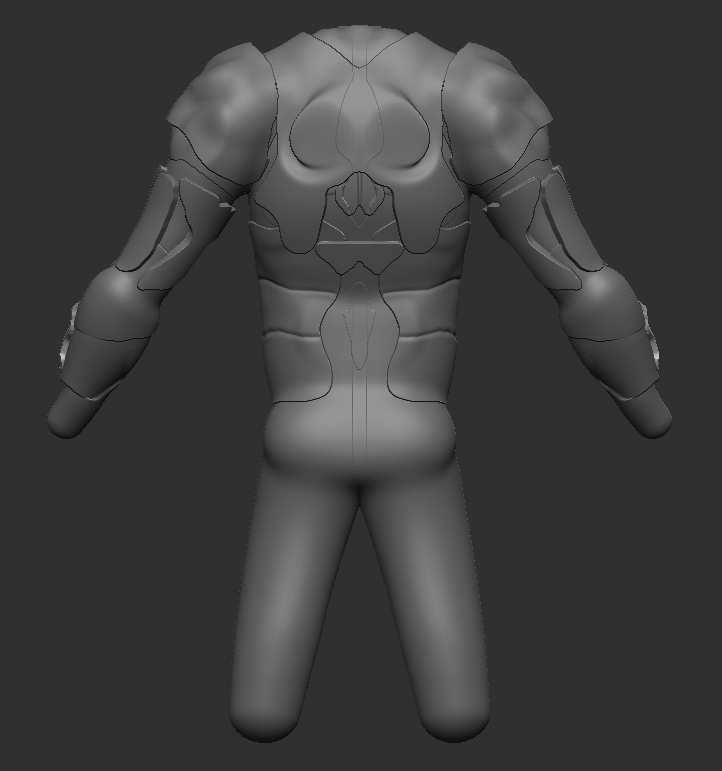
I wanted the armour to be segmented and separate from the base mesh this time so I used the extract tool to get geometry from masked parts of the base mesh and manipulated them using brushes such as move and dam standard. I prefer how this looks compared to the original as it is a more complex design. The pants were created using the extract tool again as the original pants couldn’t be used as they didn’t match the new model.

Head recombined with the Body

Last time, I ended up losing all the detail on the face so I kept the head separate from the base model this time. There was a way to combine the meshes and keep the detail but I preferred keeping them separate. I manipulated the neck geometry using the different sized move brushes to seemingly make the head connected.

Hand Version 2
Base Shape of the Leg Model

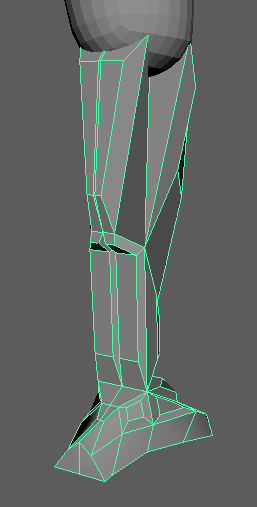
To create the leg model, I decided to use Maya as I thought it would be easier to create the look I wanted. I started with a simple cube mesh and then extruded to create the shape of the leg.

Leg Model Front

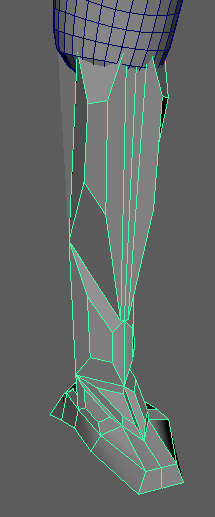
To add more complexity to the model I further used the extrude tool to allow me to scale extruded faces down.

Leg Model Back
Fibremesh Hair and Beard
Left Side Damage Front

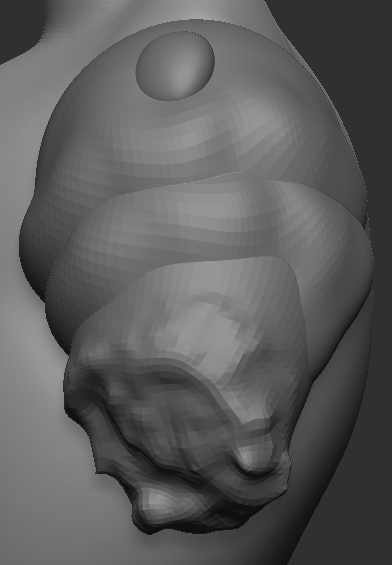
The new version of the damaged arm was done by severely deforming the arm model with the move brush. To create the rest of the damage on the left side of the character, this time I used the rake brush to deform the different elements. I think this method was more effective as this result was like the design this time.

Left Side Damage Back
Conceptual Stage and Colour Design

I knew from the start that I wanted to do some kind of cyberpunk inspired character as I was really keen on the idea of a futuristic theme for my character design. To start to conceptualise what my character was going to look like, I first gathered some inspiration images of cyberpunk character designs.

One of the designs I found referred to as Figure 5 (Bonhotal, 2020) had a face design that gave me one of the main aesthetics for my character as it had some machinery visible on only one side of the face. This reminded me of some of the early experimentation period in ZBrush that I had done as I attempted to create a Two-Face model using one of the base models within ZBrush.

Two-Face Sculpting Experiment

Although not originally part of my character idea, I decided to incorporate the idea of having two different looking sides of my character. as I came to the conclusion that it would make my character design more interesting. This is where the idea of Wyatt getting damaged in their escape came from as it allowed me to explore this ‘Two-Face’ aesthetic within the narrative of my character’s backstory. The two-sided design also helps to further link with my character’s narrative as it shows how Wyatt had their humanity ripped from them with no justifiable reason but also shows how Wyatt is still trying to cling on to the humanity they have left. To further develop this visual theme for my character I also got some reference images for the kind of aesthetic I was seeking.

I chose the two images of Ultron from Avengers: Age of Ultron, Figure 7 (Gartler, 2015) and Figure 8 (DWolf, 2015), for reference images as I wanted to mimic the visual look of how the first iteration of Ultron is visibly damaged with vital components visible but in the visual format of Figure 6 (JPGraphic, 2015). This is so there is a clear distinction between the two sides of my character design and also to make it more intriguing.

Character Design Version 1

My first iteration of my character design took heavy inspiration from Figure 4 (Giraud, 2015) as that was my favourite reference image out of the cyberpunk references. I wanted to make a similar design to it but with the two-sided visual theme and with some inspiration from the other cyberpunk references namely the leg design of Figure 2 (Germán, 2019) and the left arm design of Figure 1 (Cornet, 2016). The body style that I aimed to go for was as realistic as possible. Obviously I would have to take some liberties with the cybernetic parts but I wanted the proportion of the character to match or be similar to realistic proportions. This meant that the silhouette of my character would be harder to recognise but the fact that have of the body is damaged causing an arm to also be missing helps to mitigate this.

I chose a dark and drab colour scheme for the concept drawing of the character as I wanted the colours of the character to match with the dark narrative I crafted for their backstory and the dystopian nature of the cyberpunk genre in general. These dark colours also contrast with the bright blue cybernetic colour that I used for certain aspects of the design to further show how these superhuman augmentations aren’t natural and were forced upon Wyatt. This also plays into how they have been forced into an exile of sorts as they won’t be able to comfortably be around people, at least at first, as the cybernetic differences will be a lot for many individuals to take in and could be the cause of contention or distrust.

Character Profile

Character Description:

My character has a designation of Y-@347 as they are a product of a military experiment intended to revolutionise the battlefield with enhanced human soldiers. They have taken the name Wyatt as a twist on their designation in an effort to keep their humanity as they are unable to remember anything from their life before the experiment including their actual name.

They used to be a male soldier who was in the wrong place at the wrong time which caused them to come across military secrets that were highly classified and illegal relating to their current condition. In an effort to expose these secrets, Wyatt was caught in a very severe ‘accident’ and was subjected to the very experiments they sought to expose.

The majority of Wyatt’s human body was replaced with cybernetic parts enabling Wyatt to perform superhuman feats when at peak efficiency. The experiments resulted in the loss of Wyatt’s memory as the people in charge of the experiments wanted to keep any knowledge of their misdoings being revealed to the public.

While undergoing routine testing, a glitch within the programming of Wyatt’s subsystems allowed Wyatt to regain control of their body. Taking advantage of all of the enhanced abilities they now had Wyatt was able to escape the military installation where he was being held but suffered significant damage in the process.

Now on the run, Wyatt is seeking answers on what actually happened to him before the experiments as well as seeking some way to achieve retribution on the people responsible to stop it from being done to anyone else. However, Wyatt’s first priority is to seek somewhere to be able to repair the damage received from the escape so that their full potential can be restored allowing them to have a better chance at finding the answers they seek.

The world that Wyatt lives in is a near future version of our world where they cybernetics have advanced to the point of being able to replace the majority of a human being. However, usage of this cybernetics for military usage is heavily criticised which is why the illegal military experiments that Wyatt encountered were so secretive in the first place.

Personality:

Although Wyatt is unable to remember their past, they carry a strong sense of justice. Perhaps this is due to the injustice done to them or is an echo of the person they used to be. To that end they dedicate themselves to countering any injustice to the best of their newfound abilities even if it halts progress towards solving the conspiracy behind the horrific experiments done to them.

Wyatt tends to keep to themselves as forming any kind of relationship with anyone could put said people into danger. Alongside that the augmentations to Wyatt’s body makes it hard to seem approachable to anyone. Although they are a loner, they do care deeply about the safety of innocent people which is why they are hesitant to form relationships and is one of the main driving points for stopping the illegal experimentation they were subjected to.

Production and Development

For our first lecture of Professional Practice, we were given a small taster of what the module will be like using a task that mimics the processes we will go through for our assignment work. We started by separating a piece of paper into four squares labelled: Design, Presentation, Revision and Presentation. As a class we were then separated into small groups and tasked with making a paper airplane individually within our groups using one piece of paper to make it. This didn’t go very well for me as I couldn’t remember how to make a paper airplane that functioned. I started some sketches to try and show the process of making a paper airplane, but they weren’t helpful.

The first paper airplane design that failed spectacularly.

I folded the paper to try and make it look like some kind of airplane which was kind of successful as it did somewhat resemble a paper airplane. Everyone was tasked with throwing their finished planes from the same point in the room to the other side of the room to see how successful each person’s attempts were. My attempt was a failure as the plane spun around and went backwards. After everyone threw their planes, we were then tasked with improving a plane using the knowledge of our whole teams. However, my team didn’t have much success with the first airplane either so I decided that we should do some research on the internet.

The second paper airplane design based on an internet guide that flew further but wasn’t much more successful.

The webpage I found was a WikiHow article titled ‘How to Make a Paper Airplane’ which gave a step by step guide of how to make a paper airplane. I used this but I made some minor mistakes and then my teammates made some adjustments to the plane to try and improve its efficiency. This airplane was more successful as it actually made progress towards where it intended to go but it wasn’t that much of an improvement. Upon reflection, if I followed the guide a little more effectively our plane might have been able to make it much further.

Rising, H. (2022) How to Make a Paper Airplane. Available online: https://www.wikihow.com/Make-a-Paper-Airplane [Accessed 03/02/2022].

Level Design Portfolio, Kieran Perry, 634895

Alex/TychoBolt (2020) Level Design In Pursuit of Better Levels. Available online: https://docs.google.com/document/d/1fAlf2MwEFTwePwzbP3try1H0aYa9kpVBHPBkyIq-caY/edit [Accessed 2/12/21].

Barclay, M. (2016) My Level Design Guidelines. Michael Barclay – Level Designer. 13 May. Available online: http://www.mikebarclay.co.uk/my-level-design-guidelines/ [Accessed 2/12/21].

de Fault, A. (2020) Intensity and pacing in The Last Of Us: Left Behind, Available online: https://wireframe.raspberrypi.com/articles/intensity-and-pacing-in-the-last-of-us-left-behind [Accessed 2/12/21].

Game Maker’s Toolkit (2015) Why Nathan Drake Doesn’t Need a Compass [Video]. Available online: https://youtu.be/k70_jvVOcG0 [Accessed 2/12/21].

GDC (2015) The Level Design of Gone Home [Video]. Available online: https://youtu.be/n6__ftHSEfM [Accessed 2/12/21].

GDC (2018) 10 Principles for Good Level Design [Video]. Available online: https://youtu.be/iNEe3KhMvXM [Accessed 2/12/21].

Level Design Game Ideas
First Floor First Draft
Second Floor First Draft

Level Overview:

The above level is based around a mysterious mansion in a forest that the player is drawn to for some unknown reason and will consist of a psychological horror type narrative. The level will be very exploration heavy and will revolve around some backtracking as the player will need to find items to unlock areas or complete puzzles. The level will consist of at least six different areas of the mansion as of now including a dining area/kitchen, lodging, bedroom, an office/study area, a living room as well as an inside garden area with a water feature that will be involved in a puzzle.

Gameplay:

The game will include puzzles that the player will complete for example activating objects in a specific order or using found objects in a particular way. The game won’t be too intense as it more based on the narrative and exploration but it will use obstacles to increase the intensity somewhat such as walls closing in on a room when an action is performed which makes the player have to find some kind of solution first.

Narrative:

The player character has come across a mysterious mansion and is drawn to it for some reason. The player has no recollection of any events involving the mansion so throughout the game the player will find notes and gain hints of the horrific things that happened through ‘stranger’ more supernatural-esque means. The player actually is the owner of the mansion who used to live there with his family before his wife turned insane due to the player’s character being a workaholic as well as him cheating on her. This lead to his wife killing their child accidentally which in turn made the player character kill his wife and be deeply affected by the events which caused him to block it from his memory. This whole experience takes place inside the mind of the player character as a way of finally accepting what happened.

Characters: Elijah Whitlock (The Father), Miranda Whitlock (The Mother) and Harrison Whitlock (The Child).

Game Progression:

Mansion Exterior: The exterior acts as a semi-tutorial for the player abilities. The player finds a small shack on the way to the mansion that has a flashlight inside. The player then encounters a fallen tree that can only be crouched under which then leads to a dark forest path that can be navigated using the flashlight.

Inside Garden Puzzle: When the player first enters the mansion interior, the inside garden is the only place the player can go to in order to progress as it is here that the mansion master key (unlocks the master bedroom, lodging area and the dining area) is found as well as a statue signifying an important item for later. The player must put three reliefs (The Father, Mother and Child) found in other parts of the mansion into a pedestal which in turn brings three platforms up from the water feature. Then the player may obtain an wax block from the statue that contains the key to unlock the living room door that has a note with it that hints that the item must be melted in order to proceed.

Dining Area and Kitchen Puzzle: The walls close in after picking up The Father relief in the Kitchen pantry. The way to solve the puzzle is to find something that can replace the relief in the kitchen. The object that is found is a plastic board that is heated using one of the oven hobs which is activated with a lighter found in the main hall which can then be placed into the relief mount to stop the walls from closing.

Lodging Puzzle: Each lodging room has a specific number in it that the player must find and use on a safe in a specific order in the Kid’s Bedroom to obtain the Child relief. If an incorrect combination is entered a trap door will open and drop the player into a spike pit.

Master Bedroom Puzzle: The player must find a hidden button to be able to open a secret passage into the office area from the bedroom as the office entrance from the main hall is blocked from the other side.

Office/Study Puzzle: The player must arrange some books in the correct order which is displayed on a painting in the room. This opens up a secret part of the room which contains The Mother relief when a lever is pulled. If the book order is wrong, a deadly gas is released into the room.

Living Room Event: The player finds the living room in a terrible state with most of the furniture being overturned. In the room, the player finds three different objects that alter the appearance of the room to appear progressively more blood stained and horrifying until two bodies appear in the middle of the room which causes a cinematic in which the player character remembers what happens.

Mansion Exterior | Houzz
Mansion Exterior Reference 1
Bloxburg rustic craftsman mansion exterior 25k - YouTube
Mansion Exterior Reference 2

The above images are references for the front of my mansion which the player will see at the beginning of the game and which will be used to draw the player in.